
资料
- Buda, et al., "A systematic study of the class imbalance problem in convolutional neural networks", Neural networks, vol. 106, pp. 249-259, 2018
- Sklearn Imbalanced-Learn
- Bojarski, et al, "End to End Learning for Self-Driving Cars", arXiv preprint arXiv:1604.07316, 2016
- 一份源代码
- Udacity 自动驾驶模拟器连接模型时只accepted,无法connected问题处理
- 模拟器地址
- 博客
- keras 导包异常解决方案
自动驾驶之方向预测
数据预处理
- 是否需要调整亮度?
- 是否需要归一化(normalization)
- 是否是需要整个图像的内容,剪切图像的一部分可以吗?
- 是否需要其它的图像处理?
数据增强:确定是否存在训练集数据不平衡(Unbalance Data)
-
可以画一个方向盘角度分布的直方图(histogram),看看是否有些转动角度对应的图像的量远远大于其他?
-
如果存在数据不平衡,如果不做任何处理,训练处理的效果如何?
-
数据增强的方式有许多种,例如:
-
Under sampling
-
Over sampling
-
使用定制的损失函数,给予相对数量少的样本更大的权重
-
收集更多的训练数据,使得数据平衡
-
根据已有的训练数据人工合成新的数据
SMOTE: Synthetic Minority Oversampling Technique https://jair.org/index.php/jair/article/view/10302
-
Task 1: 设计网络结构:设计一个CNN卷积神经网络,根据输入的图像预测方向盘的度数
- 掌握CNN卷积神经网络的原理和Keras编程构建网络模型
- 使用训练数据集训练上一步构建的网络,设定合适的优化器和学习率
- 根据训练数据集和validation数据集上面的bias和variance来判断网络是否过拟合欠拟合,然后调整网络结构
数据不均衡
| Layer (type) | Output Shape | Params | Connected to |
|---|---|---|---|
| lambda_1 (Lambda) | (None, 66, 200, 3) | 0 | lambda_input_1 |
| convolution2d_1 (Convolution2D) | (None, 31, 98, 24) | 1824 | lambda_1 |
| convolution2d_2 (Convolution2D) | (None, 14, 47, 36) | 21636 | convolution2d_1 |
| convolution2d_3 (Convolution2D) | (None, 5, 22, 48) | 43248 | convolution2d_2 |
| convolution2d_4 (Convolution2D) | (None, 3, 20, 64) | 27712 | convolution2d_3 |
| convolution2d_5 (Convolution2D) | (None, 1, 18, 64) | 36928 | convolution2d_4 |
| dropout_1 (Dropout) | (None, 1, 18, 64) | 0 | convolution2d_5 |
| flatten_1 (Flatten) | (None, 1152) | 0 | dropout_1 |
| dense_1 (Dense) | (None, 100) | 115300 | flatten_1 |
| dense_2 (Dense) | (None, 50) | 5050 | dense_1 |
| dense_3 (Dense) | (None, 10) | 510 | dense_2 |
| dense_4 (Dense) | (None, 1) | 11 | dense_3 |
| Total params | 252219 |
| Layer (type) | Output Shape | Params | Connected to |
|---|---|---|---|
| convolution2d_1 (Convolution2D) | (None, 62, 62, 8) | 608 | inputs |
| convolution2d_2 (Convolution2D) | (None, 29, 29, 8) | 1608 | convolution2d_1 |
| convolution2d_3 (Convolution2D) | (None, 13, 13, 16) | 3216 | convolution2d_2 |
| convolution2d_4 (Convolution2D) | (None, 11, 11, 16) | 2320 | convolution2d_3 |
| flatten_1 (Flatten) | (None, 1936) | 0 | dropout_1 |
| dense_1 (Dense) | (None, 128) | 247936 | flatten_1 |
| dense_2 (Dense) | (None, 50) | 6450 | dense_1 |
| dense_3 (Dense) | (None, 10) | 510 | dense_2 |
| dense_4 (Dense) | (None, 1) | 11 | dense_3 |
| Total params | 262659 |
数据预处理、图像增强、网络结构
(1)图片样例:
img_dir = "data"
fig = plt.figure(figsize=(14,14))
a = fig.add_subplot(131)
img1 = cv2.imread(img_dir + "\\IMG\\left_2022_08_10_14_28_00_870.jpg")
img1 = cv2.cvtColor(img1, cv2.COLOR_BGR2RGB)
plt.imshow(img1)
a.set_title("left_2022_08_10_14_28_00_870")

a = fig.add_subplot(132)
img2 = cv2.imread(img_dir + "\\IMG\\center_2022_08_10_14_28_00_870.jpg")
img2 = cv2.cvtColor(img2, cv2.COLOR_BGR2RGB)
plt.imshow(img2)
a.set_title("center_2022_08_10_14_28_00_870")

a = fig.add_subplot(133)
img3 = cv2.imread(img_dir + "\\IMG\\right_2022_08_10_14_28_00_870.jpg")
img3 = cv2.cvtColor(img3, cv2.COLOR_BGR2RGB)
plt.imshow(img3)
a.set_title("right_2022_08_10_14_28_00_870")
plt.show()
# 角度0.0001585458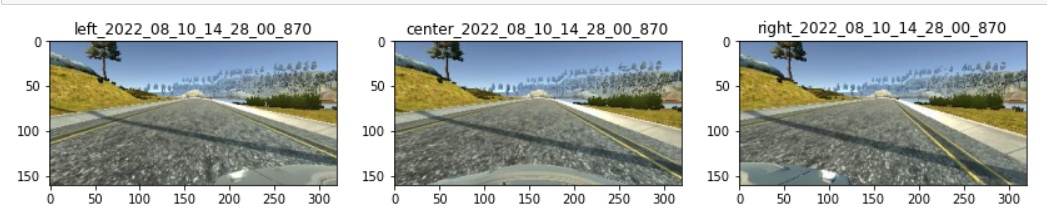
(2)方向盘转动角度随时间的变化
car_df = pd.read_csv(img_dir + "\\driving_log.csv", names=['center', 'left', 'right', 'n1', 'n2', 'n3', 'angle'])
fig = plt.figure()
plt.plot(list(car_df.index), car_df[:]['n1'].values, 'm*-')
plt.xlabel("Frame")
plt.ylabel("Steering Angle (rad)")
plt.show()1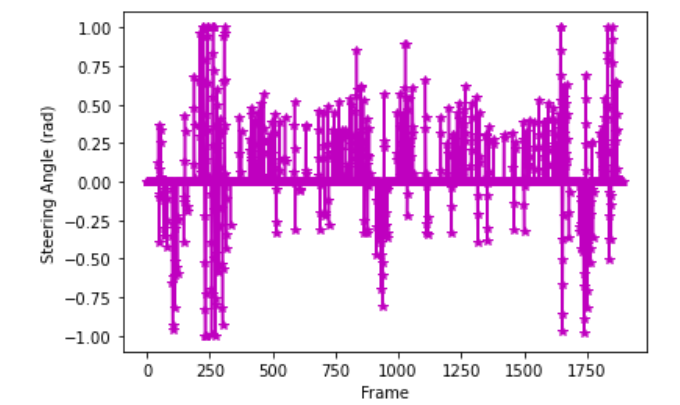
(3)角度(Y)的分布

(4)图像切割(感兴趣的区域)
- 从底向上切 20 像素,将车头部分的图像切掉
- 从上向下切 80 像素,将远方地平线以上的区域去掉
- 切割后的图像为(80,260)像素
(5)图片亮度调整
- 将图像从 RGB 色彩空间转换为 HSV 色彩空间
- 保持 HS 的值不变,将 V 的值乘以一个系数[0.1,1]
- 将 HSV 图像转化为 RGB
def random_brightness(img, degree):
    """
    随机调整图像的亮度,调整强度等于0.1(变黑)和1(无变化)之间
    :param img: 输入图像
    :param degree: 输入图像对于的转动角度
    :return:
    """
    hsv = cv2.cvtColor(img, cv2.COLOR_BGR2HSV)
    alpha = np.random.uniform(low=0.1, high=1.0, size=None)
    v = hsv[:, :, 2]
    v = v * alpha
    hsv[:, :, 2] = v.astype('uint8')
    rgb = cv2.cvtColor(hsv.astype('uint8'), cv2.COLOR_HSV2RGB)
    return rgb, degree
(6)水平翻转
def horizontal_flip(img, degree):
    """
    按照50%的概率水平翻转图像
    :param img: 输入图像
    :param degree: 输入图像对于的转动角度
    :return:
    """
    choice = np.random.choice([0, 1])
    if choice == 1:
        img, degree = cv2.flip(img, 1), -degree

    return img, degree
(7)随机去除角度为0的图像数据
def discard_zero_steering(degrees, rate):
    """
    从角度为零的index中随机选择部分index返回
    :param degrees: 输入角度值
    :param rate: 丢弃率,如果为0.8,80%的会被返回
    :return:
    """
    steering_zero_idx = np.where(degrees == 0)
    steering_zero_idx = steering_zero_idx[0]
    size_label = int(len(steering_zero_idx) * rate)
    return np.random.choice(steering_zero_idx, size=size_label, replace=False)
(8)处理左右摄像头的数据
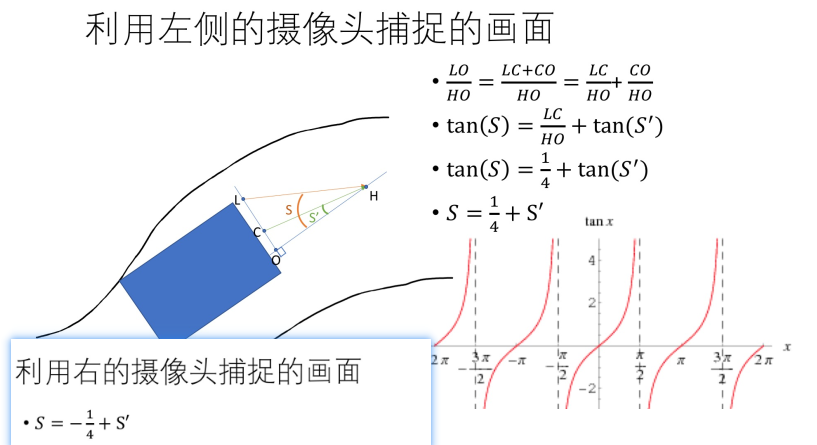
def left_right_random_swap(img_address, degree, degree_corr=1.0 / 4):
    """
    随机从左、中、右图像中选择一张图像,并相应调整转动角度
    :param img_address: 中间图像的文件路径
    :param degree: 中间图像对应的方向转动角度
    :param degree_corr: 方向盘转动角度调整的值
    :return:
    """
    swap = np.random.choice(['L', 'R', 'C'])
    if swap == 'L':
        img_address = img_address.replace('center', 'left')
        corrected_label = np.arctan(math.tan(degree) + degree_corr)
        return img_address, corrected_label
    elif swap == 'R':
        img_address = img_address.replace('center', 'right')
        corrected_label = np.arctan(math.tan(degree) - degree_corr)
        return img_address, corrected_label
    else:
        return img_address, degree
(9)图像数据正规化
图像数据的均值从127.5变为0,范围从[0,255]变为[-0.5, 0.5]
(10)数据生成器
无需预生成所有图像增强的图像,会占用太多的硬盘空间,增加读取硬盘文件所需的时间
(11)性能测试
如何测试训练好的神经网络模型?
- 模拟器测试
- 通过损失函数判断