
This flake defines a config for 2 hosts:
pc-qemu:x86_64-linux, QEMU with WHPX on a Windows 11 PCmba-utm:aarch64-linux, UTM (QEMU) on an M2 Macbook Air
From a recent NixOS minimal ISO, clone this repository to ~/nixos-configs, add the age key to ~/.config/sops/age/keys.txt, then run:
cd ~/nixos-configs
sudo ./install.sh pc-qemu /dev/vda USERNAME_HERE
# or, for UTM:
sudo ./install.sh mba-utm /dev/vda USERNAME_HERE
The username must match vars.user.username in flake.nix.
After install, you can rebuild the config with rebuild-nixos and update flake inputs with update-nixos.
To login to (self-hosted) tailnet, run ts-login script once.
To prevent gnome keyring from asking for password at boot, run empty-keyring-password script once.
Super+E: NautilusSuper+B: FirefoxSuper+Enter: foot client (using the user foot server)Super+\: choose a host with Fuzzel and connect over SSHSuper+Backspace: choose a host with Fuzzel and attach to remote NeovimSuper+Space: Noctalia launcherSuper+V: Noctalia clipboard historySuper+F: maximize the focused columnSuper+M: maximize the focused window to the screen edgesSuper+Shift+F: fullscreen the focused windowSuper+Shift+P: Noctalia session panelSuper+L: lockSuper+S: Noctalia control centerSuper+,: Noctalia settingsSuper+Q: close windowSuper+Left/Super+Right: focus the column to the left or rightSuper+Up/Super+Down: focus the window above or belowSuper+Shift+Left/Super+Shift+Right: move the focused column left or rightSuper+Shift+Up/Super+Shift+Down: move the focused window up or downSuper+mouse wheel: focus the workspace above or belowAlt+Tab: Noctalia window switcherSuper+Tab: Niri window switcherSuper+1throughSuper+9: select workspaceSuper+Shift+1throughSuper+Shift+9: move window to workspaceSuper+J: open Stremio EnhancedPrint: full-output screenshot;Super+Print: region screenshot
Windows host files and commands
Keep the VM disk, launch scripts, QEMU build, and TAP driver files together:
qemu/
├── openvpn-tap/
│   ├── addtap.bat
│   ├── deltapall.bat
│   ├── (copied later) devcon.exe
│   ├── (copied later) OemVista.inf
│   ├── (copied later) tap0901.cat
│   └── (copied later) tap0901.sys
├── qemu-virgl-whpx-20260718/
├── iso.bat
├── NixOS.raw
└── run.bat
qemu-virgl-whpx-20260718/ is the extracted build output from Tsuki-Bakery/qemu-virgl-whpx.
qemu-virgl-whpx-20260718\qemu-img.exe create -f raw NixOS.raw 128GChange 128G to desired virtual disk size. I use raw for slightly better disk latency and throughput, qcow2 is also available.
Download dist.win10.zip from the OpenVPN TAP-Windows 9.27.0 release. Copy devcon.exe, OemVista.inf, tap0901.cat, and tap0901.sys into openvpn-tap/, then add these scripts:
openvpn-tap/addtap.bat:
rem https://github.com/ggreer/mpostr/blob/ab9df3a795bea220dae9c7f49ce3e5462be6e5f1/vendor/openvpn_install_source-2.0.9-gui-1.0.3/openvpn/bin/addtap.bat
rem Add a new TAP-Win32 virtual ethernet adapter
devcon.exe install OemVista.inf tap0901
pauseopenvpn-tap/deltapall.bat:
rem https://github.com/ggreer/mpostr/blob/ab9df3a795bea220dae9c7f49ce3e5462be6e5f1/vendor/openvpn_install_source-2.0.9-gui-1.0.3/openvpn/bin/deltapall.bat
echo WARNING: this script will delete ALL TAP-Win32 virtual adapters (use the device manager to delete adapters one at a time)
pause
devcon.exe remove tap0901
pause
Run addtap.bat as Administrator from openvpn-tap/, then create the Windows
network bridge:
- Press
Win+R, runncpa.cpl, and identify both the physical network adapter used by Windows and the newly installed TAP adapter (default name isLocal Area Connection, screenshots below call itTAP). - Hold
Ctrl, select the physical adapter andLocal Area Connection, right-click either selection, and choose Bridge Connections.
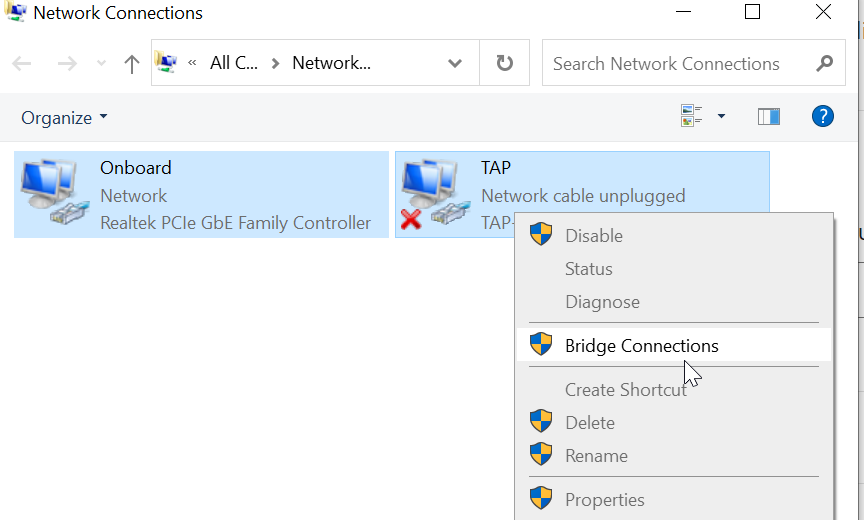
- Approve the administrator prompt and wait for Network Bridge to appear. Both selected adapters should show Enabled, Bridged.
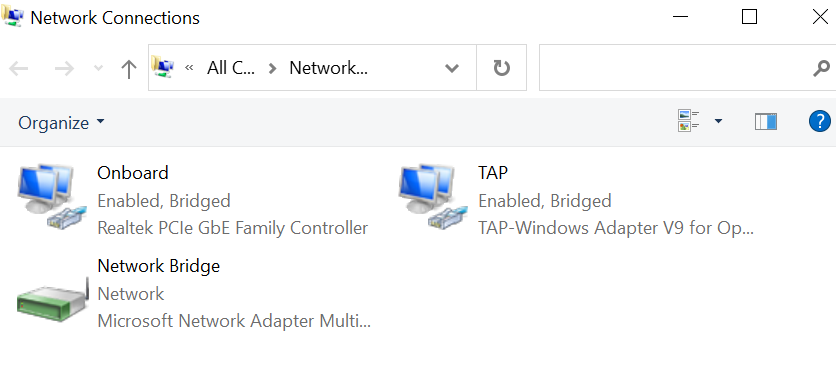
Images from Hoi Wong's Qemu for Windows Host Quirks article.
Download a recent NixOS minimal ISO into qemu/, update the filename in
iso.bat, and run it. After the VM boots, follow the Install instructions.
iso.bat:
@echo off
setlocal

set "VM_DIR=%~dp0"
set "QEMU_DIR=%VM_DIR%qemu-virgl-whpx-20260718"
set "QEMU_EXE=%QEMU_DIR%\qemu-system-x86_64w.exe"
set "OVMF=%QEMU_DIR%\share\edk2\x64\OVMF.4m.fd"

start "" "%QEMU_EXE%" ^
        -M q35 ^
        -m 16G ^
        -smp 16 ^
        -accel whpx,kernel-irqchip=off ^
        -netdev user,id=anet0 ^
        -device virtio-net-pci,netdev=anet0 ^
        -device intel-hda ^
        -device hda-duplex ^
        -usb ^
        -device usb-tablet ^
        -device virtio-vga-gl ^
        -display sdl,gl=on ^
        -drive file="%VM_DIR%NixOS.raw",if=virtio,format=raw ^
        -cdrom "%VM_DIR%nixos-minimal-26.05.4937.8eeec934ae0d-x86_64-linux.iso" ^
        -boot order=d,menu=on ^
        -bios "%OVMF%"
TAP driver is not needed for iso.bat, as it uses QEMU user networking.
run.bat:
@echo off
setlocal

set "VM_DIR=%~dp0"
set "QEMU_DIR=%VM_DIR%qemu-virgl-whpx-20260718"
set "QEMU_EXE=%QEMU_DIR%\qemu-system-x86_64w.exe"
set "OVMF=%QEMU_DIR%\share\edk2\x64\OVMF.4m.fd"
set "TAP_NAME=Local Area Connection"

start "" "%QEMU_EXE%" ^
        -M q35 ^
        -accel whpx ^
        -m 16G ^
        -smp sockets=1,cores=6,threads=2 ^
        -cpu qemu64,-svm,+topoext,+aes,+sse4.1,+sse4.2,+ssse3,+popcnt,+cx16,+movbe,+pclmulqdq,+rdrand,+rdtscp ^
        -bios "%OVMF%" ^
        -drive file="%VM_DIR%NixOS.raw",if=none,id=osdisk,format=raw ^
        -audiodev dsound,id=audio_out,latency=30000,out.buffer-length=50000,out.frequency=48000,out.channels=2,out.format=s16 ^
        -audiodev sdl,id=audio_mic,in.fixed-settings=off ^
        -device intel-hda,id=hda_out ^
        -device hda-output,bus=hda_out.0,audiodev=audio_out ^
        -device intel-hda,id=hda_in ^
        -device hda-micro,bus=hda_in.0,audiodev=audio_mic ^
        -device virtio-blk-pci,drive=osdisk,bootindex=1 ^
        -netdev tap,id=anet0,ifname="%TAP_NAME%",script=no,downscript=no ^
        -device virtio-net-pci,netdev=anet0 ^
        -device qemu-xhci ^
        -device usb-tablet ^
        -device virtio-vga-gl ^
        -display sdl,full-screen=on,gl=on ^
        -serial none

rem if not doing bridged networking with openvpn tap driver use:
rem -netdev user,id=anet0 ^
This boots the raw disk with WHPX acceleration, VirGL graphics, separate speaker and microphone devices, and the bridged TAP network.
UTM application and VM settings
Before creating the VM:
- Open UTM > Settings > Input.
- Enable Invert Scrolling.
- Click Create a New Virtual Machine.
- Select Virtualize, then Linux.
- Enable Hardware OpenGL Acceleration.
- Select the NixOS ARM64 ISO as the boot image.
- Set storage to 128 GiB.
- Set the VM name (eg. "NixOS") and finish the wizard.
Before starting the VM, open its settings and apply:
- QEMU
- Enable RNG Device.
- Enable Balloon Device.
- Disable Reset UEFI Variables.
- Input
- Enable Share USB Devices from Host.
- Sharing
- Set Directory Share Mode to None.
- Display
- Disable Resize Automatically.
- Enable Retina Mode.
- Sound
- Set Emulated Audio Card to virtio-sound-pci.