A Nintendo Entertainment System (NES) emulator written in Rust, built for learning, experimentation, and clean architecture.
It currently emulates the 6502 CPU, the PPU, the APU, controller input, DMA, and Mapper 000 & 163, and can already run games like Donkey Kong, Super Mario Bros. ... and Pokemon Yellow. It is based on javidx9's NES Emulator series.
Play it in the browser: RustiNESs Web

This Rust project was written by hand as a learning exercise. I mainly used LLMs for explanations, discussion, and a few repetitive tasks, while keeping the emulator implementation in Rust itself manual. The JS/HTML GUI was written using Claude. The following tools were also written by Claude:
- Benchmarking: RustiNESs Benchmarking
- Struggles with audio: Real-time web audio demo
- 6502 CPU emulation
- PPU background and sprite rendering
- APU (pulse 1, pulse 2, noise)
- DMA transfers to OAM
- Controller input
- Mapper 000 & 163 support
- WebAssembly browser build
- CPU validation using Harte tests (you need to download these manually from here)
- Quick save and reload.
- Add mapper 163 for 雷电皇 比卡丘传说 - an inofficial Pokemon Yellow game for NES using the wonderful nesdev documentation with a bit of LLM help. Check it out (here)[https://www.youtube.com/watch?v=WJmAl2DNvU8].
- Mapper 163 is a small custom board
- 32 KB PRG-ROM - it can address up to 32 x 32 KB banks and Pokemon is about 1 MB of PRG-ROM - very large
- 8 KB battery-backed PRG-RANM for savestates
- Weird piracy protection
- Add emulator serialisation for quick save and load! This is really easy given the code structure. We derive from
serdefor all classes that need serialisation and only need to worry about the class members that should not go into the binary file because they would bloat it. I decided to opt for a binary serialisation here, but I also implemented an interface forserde_jsonwhich is super nice for editing the save file in a text editor (cheats & debugging). - The only issue I stumbled upon: I had only used stack memory so far, but when loading the serialised classes, I got a stack overflow! On top of that
serdereally does not like large arrays - you needserde-largeto serialise them. Therefore, I decided to turn all largers arrays with more than 8 elements into vectors with memory on the heap. May the memory management gods forgive me.
- Noise now works to the point where SMB sounds nice !
- But performance is still an issue because the emu runs on the main thread. Under usual circumstances, performance looks as follows:

- WASM needs below 10 ms per frame and my laptop can ensure a stable 16 ms per frame
- But when the OS starves the browser process because it does something else, everything stalls, despite good optimisation. This means I probably need to move the emulator to a web worker thread.

- Sequencer counts down if it is enabled and clocked, we then do something
- Suppose we have a 8-bit word representing a 50%-duty cycle
- The sequencer could output 0's and 1's that way
- Sequencer for the pulse wave channel sets a frequency and a duty cycle

- But - sound sounds terrible with a square pulse wave - so we actually approximate it using a Fourier transform
- Using a real sine function for this Fourier transform is terribly slow - so we actually use a fast approximation
- After implementing both pulse wave channels, the sound actually starts sounding okay
- But performance is still an issue - my emulator is too slow. With audio, the performance dropped to 10 ms per frame.
- 29% of total emulation time is spent in the fast sine approximation
- 8% is spent in the loop adding the harmonics
- After some research, I decided that wavetables are the way to go - We precompute the waveforms at a given temporal resolution for different duty cycles
- This requires more RAM (4096 * 4 * 4 bytes for f32 = 64 KB) but makes the wave sampling a simple array
- With the wavetable, performance is below 5 ms per frame again - I checked this in my browse using [this tool] (https://kunkelalexander.github.io/rustiNESs/benchmark.html) Claude kindly provided

- Add FPS counter in top left corner - SMB seems to be running at a constant 60 FPS with sound now.

- Watch NES Emulator Part #6: APU - Sounds, Beeps & Bloops
- Sound is unforgiving - we need to make sure that the timing is perfect
- We cannot just issue sound samples to the audio device, instead we need to send them at the rate that the audio device expects
- The audio device runs in its own thread and requests a sample of sound when it needs it
- Retro sound: Approximate pulse-square waves using Fourier transform
- NES APU has five audio sources:
- two pulse-square waves with different duty cycles for melodies
- sawtooth for base sounds
- noise channel for percussion
- sample playing channel for waveforms

-
Different approaches for producing audio
-
Approach 1:
- Frame loop fires every 1/60 = 16.7ms
- We run the emulation for 1 frame
- Push ~44100/60 = 735 samples to ring buffer
- Audio worklet drains ring buffer independently
- Result: If the emulation takes too long, I get terrible-sounding buffer underruns. Even for 6ms per emulation frame, I get some crackling. Audio is really a different beast.
-
Approach 2:
- Frame loop fires every 1/60 = 16.7ms
- We check the current state of the ring buffer
- If there are too many samples, we skip a frame
- If there are not enough samples we run enough frames to fill it
- Every time, we push 44100/60 ~ 735 samples to ring buffer
- Audio worklet drains ring buffer independently
- Result: In general, this tends to work okay but is also not very robust. Sometimes, there are too many samples on the buffer when the audio system fails to empty it at start-up and the first seconds of the run are spent skipping frames to empty the buffer.
-
Approach 3:
- Audio worklet fires every 1/44100 = 2.9ms
- Reports buffer level back to main thread
- Main thread checks buffer level
- If buffer level is low, we run 2 frames of emulations and push 2x samples,
- If buffer level is high, we skip the emulation and push nothing
-
Approach 4 - the gold standard and Javidx9's approach:
- Audio worklet fires every 1/44100 = 2.9s
- Asks: How many samples do I need
- The emulation runs long enough to produce those samples. This works because NES emulation is fast
- Whatever the PPU last rendered is drawn to the screen
- This is called synchronising to sound
-
-
Claude kindly provided this tool which lets you explore the different approaches to some extent. Approach 4 is most closely reflected by approaches 4/5 in the tool. However, we are still stuck to an asynchronous architecture in the browser. A
SharedArrayBufferwould make these approaches more similar to a native approach, but this requires cross-origin isolation with GitHub Pages disables by default. Enabling it would require an external script and a page reload which I do not want. So, I prefer living with imperfect audio for now. -
Actually, I realised that the performance of the emulation itself is still a bottleneck. If frame generation takes too long, audio is necessarily going to lag behind
- Debug: 28ms per frame
- Release: 4ms per frame
-
Time for profiling using
samply record .\target\release\nes_cli.exe -
80% of the runtime is spent inside the GPU clock function
-
After switching to generics for static dispatch and rewriting the Loopy structure, I observe the following improvement
| Function | Before abs. time | Before rel. time | After abs. time | After rel. time |
|---|---|---|---|---|
ppu::Olc2C02::clock |
30.064 | 79% | 23.109 | 80% |
ppu::Olc2C02::get_colour_from_palette_ram |
5.609 | 15% | — | — |
ppu::impl::read_ppu |
2.768 | 7.2% | — | — |
ppu::Olc2C02::update_shifters |
2.185 | 5.7% | — | — |
ppu::Olc2C02::compose_pixel |
— | — | 8.763 | 30% |
ppu::Olc2C02::fetch_background_tile |
— | — | 7.635 | 26% |
ppu::Olc2C02::load_background_shifters |
450 | 1.2% | 23 | 0.1% |
ppu::Olc2C02::get_pixel |
298 | 0.8% | — | — |
ppu::Olc2C02::increment_scroll_x |
217 | 0.6% | 31 | 0.1% |
ppu::Olc2C02::increment_scroll_y |
34 | 0.1% | 1 | 0.0% |
cpu::Olc6502::clock |
5.611 | 15% | 3.627 | 13% |
read_ppuandget_colour_from_palette_ramdo not take any time anymore which explains the 7 ms performance gain (10,000 frames). I also broke down the clock function intocompose_pixelandfetch_background_tile. This leads me to believe that the root evil are still all the pixel-wise operations.- With the help of my friend Claude Code, I verified that scanline-by-scanline operations could get us below 2 ms per frame, but I don't really like the idea. So, let's stick with the current performance of around 3 ms per frame.
- Clean-up!
- Sprites get stored in their own internal memory of the PPU - the Object Attribute Memory (OAM)
- OAM is 256 bytes of storage exclusive to the internals of the PPU
- OAM can stores 64 sprites - Mario in SMB is composed of several 8x8 tiles - each is considered a sprite with a unique ID
- The CPU must keep track of all of the tile id's making up the larger sprite and move them around
- PPU supports 8x8 and 8x16 sprites - they are rendered similarly

- CPU can communicate with the PPU via 8 registers - is what we said so far
- 2 are for the PPU - OAM ADDR and OAM DATA
- CPU can populate the address and then write the data to it
- To fully populate the PPU, the CPU would need to write 256 addresses and then write data 256 times
- BUT: This is way too slow
- Instead, the CPU talks to the PPU via a secret 9th register that can only be written to
- Writing to this secret register starts sorcery called Direct Memory Address (DMA)
- Upon writing to the DMA register, the CPU is suspended - the clock is switched off, and for the subsequent 512 clock cycles bytes are written from the CPU memory and written to the PPU

- DMA writes a page from the CPU memory to the PPU memory in one go - this is four times faster than manually transferring data.
- I implemented the DMA and can confirm that the output for the Donkey Kong menu cursor sprite is the same as in the video :)
0: (56, 127) ID: A2 AT: 00
1: (0, 255) ID: 00 AT: 00
2: (0, 255) ID: 00 AT: 00
3: (0, 255) ID: 00 AT: 00
4: (0, 255) ID: 00 AT: 00
5: (0, 255) ID: 00 AT: 00
6: (0, 255) ID: 00 AT: 00
7: (0, 255) ID: 00 AT: 00
8: (0, 255) ID: 00 AT: 00
9: (0, 255) ID: 00 AT: 00
- Once the OAM has sprite information, we need to detect which sprites are visible
- At the end of a scanline, we determine which sprites are visible for the next scanline
- Compare y-coordinate of the sprite with the y-coordinate of the scanline, that sprite is a candidate
- There is a situation called sprite overflow: If there are more than 8 sprites per scanline, the NES sets a sprite overflow flag
- The process can be described as follows
- End of scanline, search OAM for max of 8 sprites visible on next scanline
- As scanline scans, reduce sprites x coord
- If x = 0, start to draw sprites
- Resolve priority of sprite pixel
- Orientation: We can instruct the PPU to draw the sprite inverted in both axes. This means that we don't need two sprites for Mario running left and right
- Horizontal flipping: invert bits from 00000111 to 11100000
- Vertical flipping: We need to actually read elsewhere - this is easier for 8x8 than for 8x16 tiles
- There is one more complication - many games want to show a static status bar and scroll below
- This is solved by detecting the collision of sprite 0 with the scanline. If the scaneline hits sprite 0 and we know its location, the CPU can change rendering behaviour.
- For instance, Mario does this by rendering the bottom half of the coin in the status bar as sprite 0. Once the scanline hits sprite 0, the CPU knows that it can start scrolling.

- I gave implementing the sprite rendering a first go, and behold: Donkey Kong & Super Mario Bros seem to be working - YAY!!!!

- I tried to improve the UI, but the LLM code is just abysmal - I will redo the UI from scratch I guess
- Claude actually fixed the UI code while maintaining much of it. Great!
-
8 NES buttons are represented via one byte
-
Two controller ports mapped to addresses $4016 and $4017
-
CPU writes - PISO stores 8 bits
-
CPU reads - PISO returns 1 bit via a shift register
-
To fully read the state of the controller, the CPU must write to the memory map register and read 8 times

- Implement controller input - it works nicely for the
nestest.nesROM in the main menu, but then it gets stuck - I suspect that there is still a bug in the CPU emulation

- Hallelujah:
nestest.nesandsmb.nesbackgrounds are rendered correctly!


- Fix bug in CPU NMI code
- Load
smb.nesand show pattern table

- Background of the game is stored in a nametable - 32 x 32 bytes
- Pattern memory is 16 x 16 tiles -> There are are 256 tiles we can put in a nametable location
- Each tile is 8x8 pixels, therefore the nametable contains 32x8 x 32x8 = 256 x 256 pixels
- BUT not all rows of the nametable are used and the effective vertical resolution is 240
- In its simplest form, the nametable contains a full vertical screen (e.g. DK)
- SMB needs to scroll via the scroll register of the PPU

-
The NES actually stores two nametables and we render from two nametables at the same time for scrolling with wrapping in two directions
-
Actually, there are 4 nametables via mirroring
-
As you are scrolling in a given direction, the CPU needs to update the nametable
-
At the bottom of the nametable, there are 64 attribute bytes - we get one byte for every every 8x8 tiles and they specify the palette for every 2x2 tiles

- Let's dive right in: We fill in the PPU code for reading and writing to 0x2000 - 0x2FFF from PPU RAM: In my implementation, the cartridge decides how to map addresses to the name table based on the mirror flag. We can output the first nametable for the nestest ROM as text:

- Very nice - we could actually display the background by choosing the right tiles from the palette but I would like to implement the whole thing first
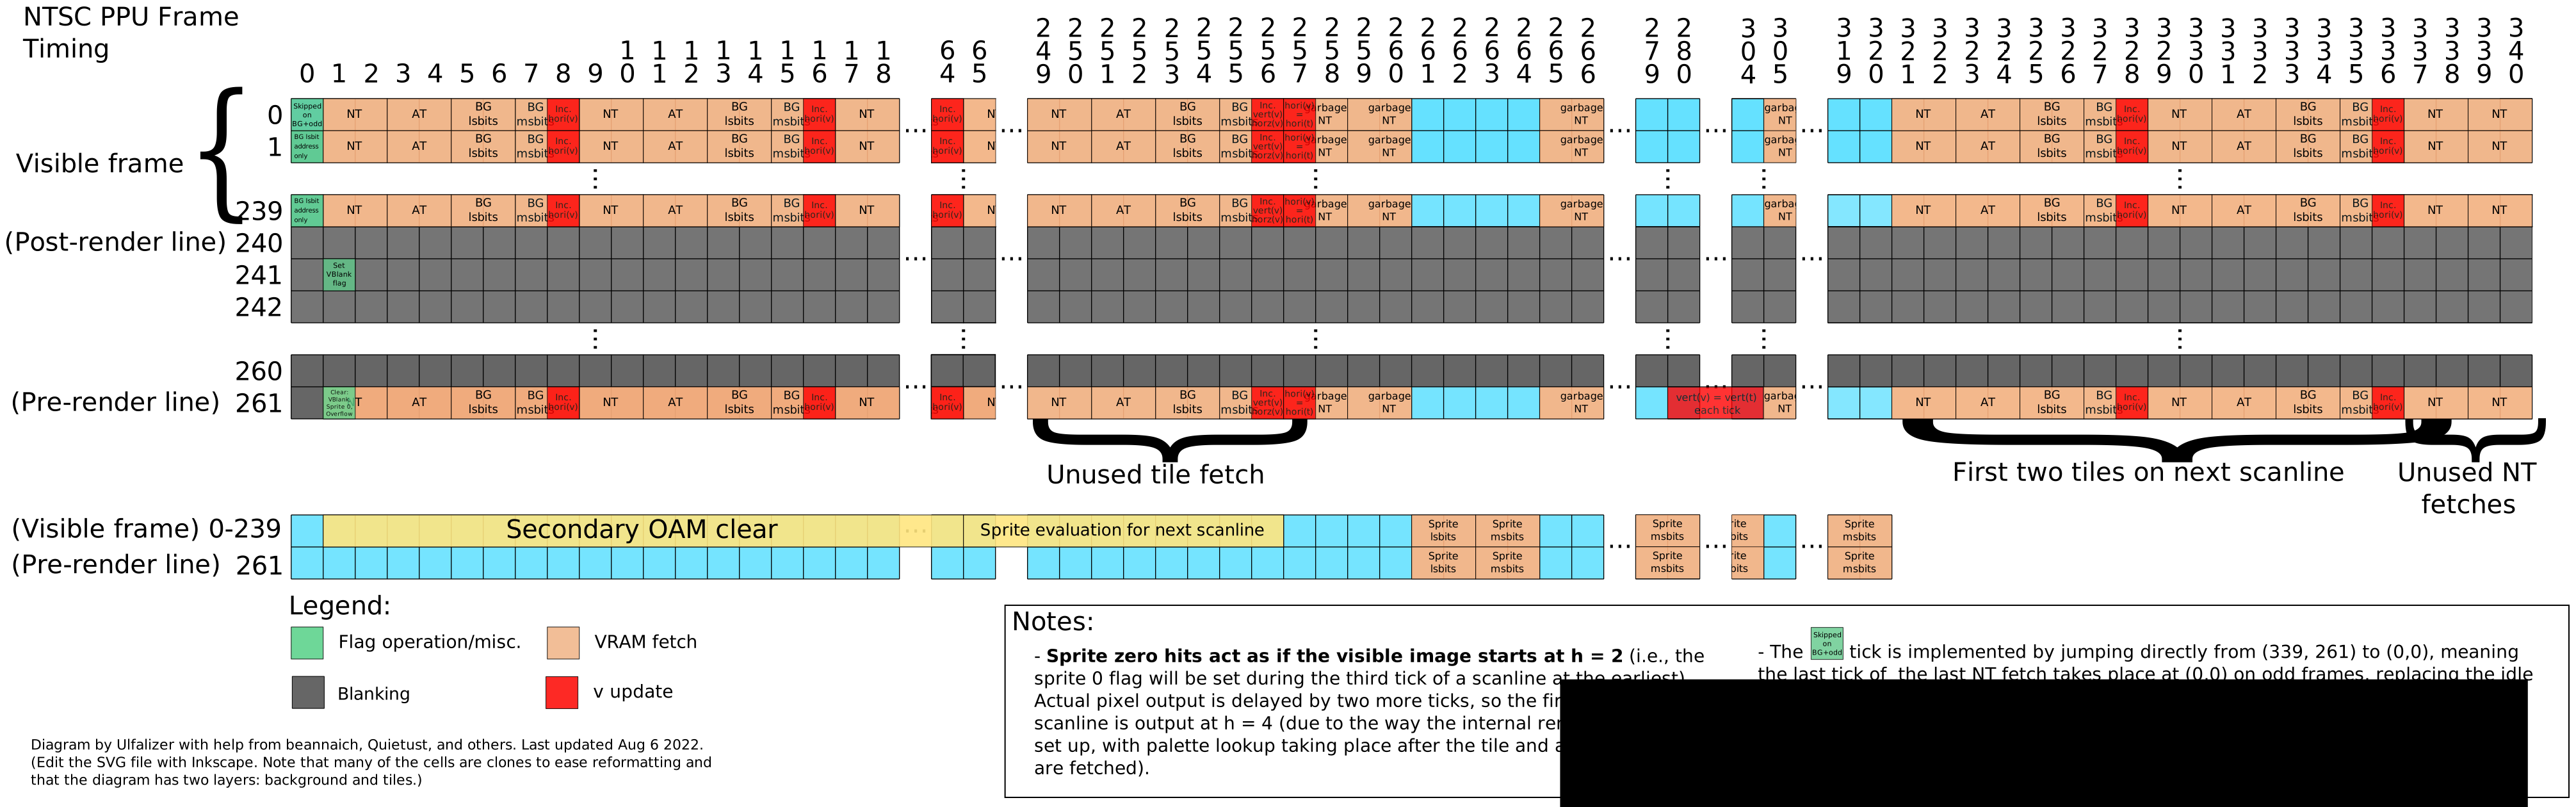
- To get things to render properly, we need to count scanlines and cycles which is where this handy diagram from nesdev comes in

- 8 cycles represent 1 row of one tile
- During thoses 8 cycles, it loads the next 8 bytes for the next 8 cycles: It loads one nametable byte, one attribute byte and the pattern itself (2 bytes)
- This repeats for the 256 visible pixels and then we get to the cycles where nothing is rendered (257 - 340)
- Loopy address (named after a wonderful person called loopy): Internal address for the PPU that correlates the scanline position to everything else, explained here
- Finish pattern table viewer
- To render stuff, the PPU needs three things:
- The pattern data at 0x000-0x1FFF stored in CHR (ROM or RAM) that defines whether a pixel is 0, 1, 2 or 3
- The nametables which says which tiles go where at 0x2000 - 0x2FFF from PPU RAM
- The palette which stores what the colour indices 0, 1, 2, 3 actually mean stored at 0x3F00-0x3F1F in PPU palette RAM
- The pattern data can be in the ROM file (CHR banks > 0). The PPU reads it directly from the cartridge. This is fast and many simple games use it, but the CPU cannot modify pattern data.
- the pattern memory can also be empty RAM and the CPU must upload graphics manually in that case - the CPU writes to $2006/2007 and then writes to PPU pattern RAM, this happens every frame during VBlank
- Load
nestest.nesfrom Nesdev.org and show pattern table

-
PPU has access to three memories
-
8 KB pattern memory for sprites stored as bitmaps
-
4 KB nametable containing the layout
-
1 KG palette for colours

- 8 KB pattern memory is split into 4 KB sections
- They are split into 16x16 tiles
- Each tile is 8x8 pixels
- So each section is a 128x128 image
- We go via the mapper to access the pattern memory
- The pattern can switch between sections for animations.

- A tile is an 8x8 bitmap where each bit is actually represented by 2 bits = 4 colours
- There are actually two bitplanes - the least-significant bit plane and the most-significant bit plane
- They can be indexed with

- The palette can be indexed efficiently, every row has three colours + transparent

- CPU talks to the PPU via eight registers, mirrored over a wide address range

- CPU is setting up the PPU during the vertical blank period

- PPU now wired up in the web interface

- The hardest bit was for implementing video 3 was to decide how to wire up the different components to reduce dependencies
- In my implementation, the Bus owns the RAM, the PPU and the cartridge, the CPU is by itself and the cartridge owns the mapper
flowchart TD
    Emulator
    CPU
    Bus
    PPU
    Cartridge

    Emulator --> CPU
    Emulator --> Bus
    Bus --> PPU
    Bus --> Cartridge
- I decided to implement the Component pattern via a number of Interfaces that expose the read and write functions of the different NES components
classDiagram

    class BusInterface {
        +read(addr, read_only) u8
        +write(addr, data)
    }

    class PpuInterface {
        +read_cpu(addr, read_only) u8
        +write_cpu(addr, data)
        +read_ppu(addr, cartridge) Option<u8>
        +write_ppu(addr, data, cartridge)
    }

    class CartridgeInterface {
        +read_cpu(addr) Option<u8>
        +write_cpu(addr, data) Option<()>
        +read_ppu(addr) Option<u8>
        +write_ppu(addr, data) Option<()>
    }

    class MapperInterface {
        +cpu_map_read(addr) Option<usize>
        +cpu_map_write(addr, data) Option<usize>
        +ppu_map_read(addr) Option<usize>
        +ppu_map_write(addr, data) Option<usize>
    }

    BusInterface <|.. Bus
    PpuInterface <|.. PPU
    CartridgeInterface <|.. Cartridge
    MapperInterface <|.. Mapper000
Core Issue: 89,342 clock() calls per frame 341 cycles × 262 scanlines means clock() is invoked ~89K times per frame. Each invocation pays for:
At least 8 branch evaluations (if render_scanline && ...) that are nearly always identical within a region The fetch_background_tile → update_shifters call chain, which does one pixel of work per call through multiple indirections Cache pressure from touching self (a large struct on the heap) 89K times On a modern CPU, branch misprediction alone on those 8 guards is enough to account for most of the 5ms.
Hidden Allocation Bug Every visible scanline calls this (ppu.rs:~543):
self.sprite_scanline = SpriteScanline::default(); SpriteScanline is SpriteArray<8>, whose Default implementation does vec![Sprite::default(); 8]. That is 240 heap allocations and 240 drops per frame, or ~14,400 per second. This is a real cost that shows up as allocator pressure, not as PPU logic time.
Fix: change Vec inside SpriteArray to [Sprite; N] — sprites are small and N is a const, so a fixed-size array works perfectly:
pub struct SpriteArray { sprites: [Sprite; N], // was Vec } impl Default for SpriteArray { fn default() -> Self { Self { sprites: [Sprite::default(); N] } } } Alternatives to Scanline Rendering Scanline rendering ("line by line") is not the only approach. Ranked by impact:
-
Tile-strip precomputation — instead of using the hardware-accurate shifter one bit at a time, compute all 8 pixels of a tile row in one shot. For each tile you read 2 bytes (lo/hi pattern plane), then expand them into 8 pixels with bitwise ops. This removes the shifter entirely and does O(tiles) work instead of O(pixels). This is roughly equivalent to scanline rendering in effect, but lets you avoid restructuring the outer loop.
-
Lazy / dirty-tile rendering — cache pre-decoded tiles and only re-render a tile when its CHR data, palette entry, or attribute byte changes. In most games the vast majority of tiles are static frame-to-frame. This is O(changed tiles) per frame rather than O(all pixels), and can be orders of magnitude faster for static screens.
-
Direct CHR access — read_ppu() currently goes through cartridge.read_ppu() first, then falls through 4–5 branch conditions on every call. For CHR reads during rendering you always know the address is in 0x0000–0x1FFF. A dedicated read_chr(addr) that goes straight to the pattern table array (or a cartridge-provided CHR slice) eliminates those branches and the trait indirection on the hottest path.
Summary Change Effort Impact Fix Vec → array in SpriteArray Low Removes 14K allocs/sec Direct CHR read in tile fetch Low Removes branch chain per pixel Tile-strip computation (drop shifter) Medium ~10× fewer ops per pixel Dirty-tile caching High Near-zero work for static frames The allocation fix is a pure bug — worth doing immediately regardless. The real architectural win comes from ditching the per-cycle shifter model, whether you do that via scanline batching or tile precomputation.
-
The RAM has 8 kB of addressable space but actually it's 8 kB mod 2kB - an idea called mirroring

- The modulo operation is expressed via a bit-wise logic and 0x1234 & 0x07ff = 0x0234 which is within the addressable range
- There is more than just the RAM attached to the Bus and the Picture Processing Unit also has its own micro-Bus. Both buses access the cartridge which contains the program ROM, a mapper and patterns

- The cartridge can contain many memory chips and the mapper maps addresses to the right memory location based on how it was configured by the CPU/PPU - This is why there where no loading times, it's just the addresses were mapped differently.

- Switch from function pointers in lookup table to match statement with enum to avoid compiler warnings (and I personally also really dislike function pointers from C, I am sure this will also make debugging easier)
- Work on making Harte's test suite pass with help from Nesdev and ChatGPT
- It feel really good to see tens of thousands of test cases passing :)
- All Harte tests for legal operations pass now. I am very happy I chose to test my implementation because I did find a few bugs that would have been annoying to find otherwise.
- Update web interface to except byte code and to correctly load programs - it can now be used to test the emulator. Next up is Javid9x' second video.
- Finish implementing CPU instructions
- Wire up Harte's test suite for testing all the operations: https://github.com/SingleStepTests/65x02/tree/main
cargo test --release -- --nocapture- Fails :/, that's for another day
- Learn Rust from ChatGPT
- Implement more instructions
- Add Web GUI for debugging 6502 emulator - it is not fully functional yet but accessible via: https://kunkelalexander.github.io/rustiNESs/
- I decided to compile the rust code using web assembly
wasm-pack build --target web --out-dir docs/pkgand have ChatGPT write a GUI using JS/CSS/HTML. I really like this solution as it forces me to write a clean Rust interface and does not add unneccessary code to the emulator itself
- I decided to compile the rust code using web assembly

- Watch NES Emulator Part #1: Bitwise Basics & Overview
- Watch NES Emulator Part #2: The CPU (6502 Implementation)

- A CPU in isolation does nothing
- CPU (6502) needs to be conntected to a BUS

- Address and data lines of the CPU are connected to the CPU
- CPU sets address of the BUS - other devices need to react
- BUS has a 16-bit address space from 0x0000 to 0xFFFF
- Every device gets assigned an address range on the BUS
- In our system: 64 kB of RAM containing variables as well as the program itself
- The CPU extracts bytes from the RAM in order to execute them
- We need a CPU, a BUS and a RAM

- 16 address bits: A0-A15
- 8 data bits: D0-D7

- Not all instructions are the same length
- Different instructions need different numbers of clock cycles to execute
- 56 legal instructions
- First byte of the instruction provides us with the length and the duration of the instruction

- The above tables shows the Op Codes of the different instructions
- LDA $41 - we load immediate data and this is a 2-byte instruction
- LDA $0105 - load from memory address and this is a 3-byte instruction
- CLC - 1-byte instruction
- For a given instruction, we need to emulate its function, its address mode and the number of cycles

-
We can refer to the instructions using a 16x16-table index by 4+4 bits = 1 byte.
-
The first byte read can be used to index the table
-
Suppose we index LDA, IMM, 2, 2 - load the accumulator from an immediate data centers, it's a 2-byte instruction (left number) and takes 2 cycles (right number)
-
The blank spaces refer to illegal Op Codes - the CPU will do things but they may be unexpected
-
Sequence of events
-
- Read byte @ PC
-
- The Op Code derived from the byte gives addressing mode and number of cycles
-
- Read 0, 1, or 2 more bytes
-
- Execute
-
- Wait, count cycles, complete
-
src/
├── main.rs          # Entry point
├── cpu.rs           # 6502 core (registers, execution)
├── ppu.rs           # Pixel processing unit - the GPU
├── apu.rs           # Audio processing unit - the APU
├── cartridge.rs     # Cartridge template
├── mapper.rs        # Add more mappers here
├── bus.rs           # Contains RAM, PPU, cartridge and controller, but not the CPU to avoid rust's double borrow checks
├── nes.rs           # Contains the bus, the CPU, handles DMA and defines all user-facing functions
├── interfaces.rs    # Defines virtual interfaces for all components to minimise coupling
├── lib.rs           # Web assembly wrapper for actually using the emulator in a browser
├── main.rs          # Local debug code, no GUI

figures/             # Figures used for the README
tests/               # Harte CPU tests
- Local application for debugging:
cargo run - WASM library for the web application:
wasm-pack build --release --target web --out-dir docs/pkg - Test the web application with
python -m http.serverand go tohttp://localhost:8000/docs/in your browser - I tested the application with Firefox - Tests:
cargo test --release -- --nocapture(uncommentserdeincargo.tomland download tests here)